Step-by-Step Guide: Submitting Your Squarespace Sitemap to Google

Submitting your website's sitemap to Google Search Console is essential in optimizing your Squarespace site for search engines. When you add your Squarespace sitemap to Google, it allows Google to crawl your website more effectively, resulting in improved search engine optimization (SEO).
When you add your sitemap to Google Search Console, you can monitor your website for error messages, such as broken links and other SEO issues. These errors can negatively impact your search rankings, so addressing them promptly is essential to maintain good visibility in search results.
But what exactly is a sitemap, and how does it contribute to website SEO and visibility on Google?
According to Google - "A sitemap is a file where you provide information about the pages, videos, and other files on your site, and the relationships between them." In a nutshell, your sitemap provides information about all the important pages on your website and gives search engines the details they need to understand your site's structure and navigate it more effectively. When your sitemap is regularly updated, it also helps Google stay informed about any changes to your site, including the addition of important new pages.
While a sitemap is not the only tool Google uses to crawl and index your website, having an up-to-date sitemap can significantly boost your site's SEO. And this is why
Finding your Squarespace sitemap is easy because Squarespace automatically generates an XML sitemap for you. You don't need to use a separate sitemap generator. Every time you change your website, Squarespace updates your sitemap accordingly. YAY! Squarespace!
How To Find Your Squarespace Sitemap
Accessing your Squarespace sitemap is easy. Simply add "/sitemap.xml" to the end of your primary domain's URL. When using the built-in Squarespace domain, your sitemap URL will look like this: "https://domainname.squarespace.com/sitemap.xml." If you have a custom domain, the URL will look like "https://www.domainname.com/sitemap.xml." Here's an example of a sitemap generated by Squarespace:

How To Submit Your Sitemap to Google
Next, it's time to set up your website's Google Search Console account and include your sitemap URL. This step is crucial as it lets Google find and comprehend your website and sitemap quickly and easily.
Log in to Google Search Console at: https://search.google.com/search-console
Select your website property from the Property dropdown menu at the top-left corner.
In the left dashboard menu, navigate to the "Index" section and choose "Sitemaps."
In the "Add a new sitemap" section, enter "sitemap.xml" in the field following your website's URL.
Click "Submit."
Below is a screenshot showing where to add your sitemap URL in Google Search Console:
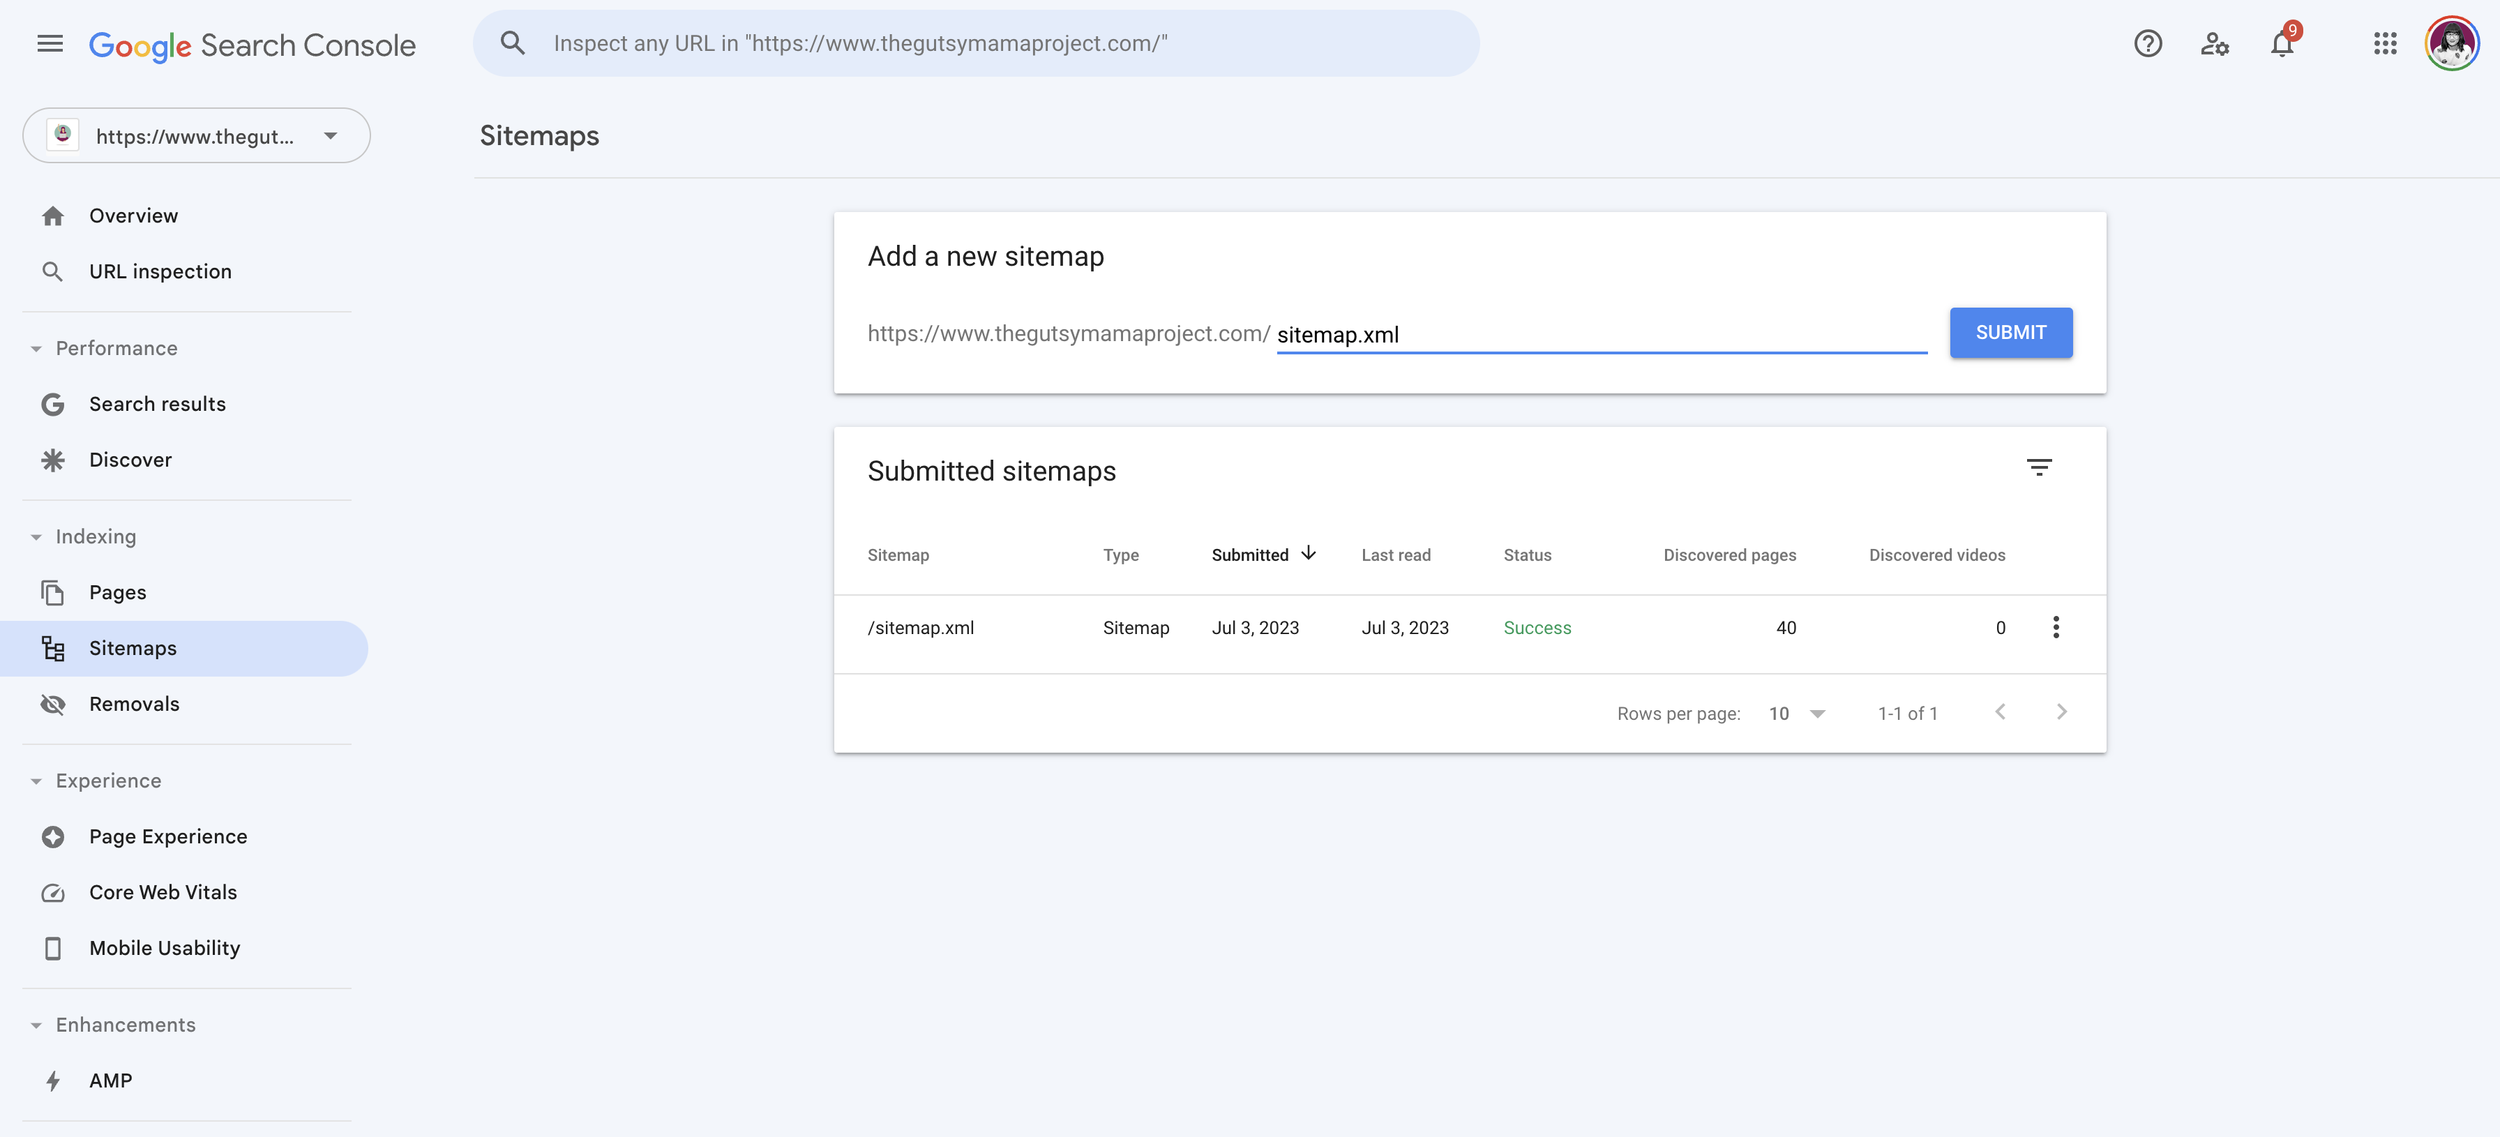
After adding your sitemap URL, Google will display it in the list of "Submitted Sitemaps," along with information about when it was last crawled and the status of indexed URLs. Please note that Google won't crawl your sitemap immediately, but it will periodically check your sitemap URL as the crawlers reindex the content on your website.
Once Google indexes your website using the sitemap you have submitted, you can start using Google Search Console to identify and fix 404 errors and broken links. It may take a few days for Google Search Console to index your site if you've only recently had your website to Google Console. So be patient.
To check for broken links and other errors, navigate to the "Coverage" report in the "Index" section of the Google Search Console dashboard. The first tab in this report displays pages with errors, categorized by different types of errors. One common error type is broken links that create "404" or "Page not found" error messages.
Two common scenarios lead to 404 errors:
Unpublished, hidden, or deleted pages: If you delete, hide, or unpublish a page, blog post, or product in Squarespace, any existing links to that page will also stop working.
Changed URL slug: If you modify the URL slug of a published page, blog post, or product in Squarespace, any links to the previous URL slug will stop working, aka break.
Multiple 404 errors on your website can negatively impact your search rankings because search engines may assume the site is poorly maintained and has low-quality content. Therefore, using Google Search Console to identify and fix 404 errors is crucial.
How to Fix 404 Errors on Your Squarespace Website
To resolve a 404 error, you need to create a 301 URL redirect from the broken URL to a functional page. In some cases, such as a deleted page, you may redirect users to your homepage. For pages with changed URL slugs, use a 301 redirect to send users to the updated URL.
In Squarespace, you can manage redirect rules in the Settings > Advanced > URL Mappings dashboard. As an example, to redirect users from a page you have deleted to the homepage, add the following URL redirect rule:
/deleted-page-url-slug -> /homepage -url-slug 301
For a page with a new or changed URL slug, use this URL redirect rule:
/old-url-slug -> /new-url-slug 301
This support article can teach you more about creating URL redirect rules on Squarespace.
How To Hide Pages From Search Engines
If there are pages on your Squarespace site that you don't want search engines to include in search results, you can exclude them from your sitemap. For instance, a "thank you" page that users are redirected to after completing a form may not be relevant for search results. To exclude a page from the sitemap, go to the Page Settings menu, navigate to the "SEO" tab, and activate the "Hide Page from Search Results" slider. This setting adds a "no index" tag to the page headers and excludes it from the sitemap.
Troubleshooting Your Squarespace Sitemap
Are you having trouble accessing your Squarespace sitemap? Here are some troubleshooting tips.
Trial mode: Squarespace doesn't generate the automatic sitemap while your website is in trial mode. You'll need to upgrade your website to a paid hosting account to have the sitemap generated.
Private or password-protected sites: Your sitemap won't load if your website is set to "private" or "password-protected." Make sure your site's settings are set to "Public." You can check these settings in Settings > Site Availability.
By following these steps and utilizing Google Search Console, you can ensure that your Squarespace website is effectively crawled, indexed, and maintained for optimal SEO performance.